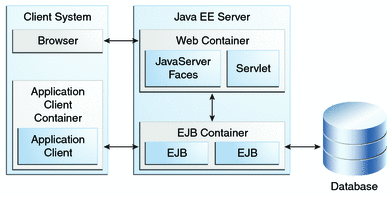
J2EE Applications are made up of components such as JavaServer Pages (JSP), Java servlets, and Enterprise JavaBeans (EJB) modules. ... Administrators install J2EE applications onto the Application Server by deploying J2EE JAR files onto one or more server instances (or clusters of instances).

J2EE application components
J2EE component framework is only a rudimentary infrastructure—in the form of libraries, base classes, and interfaces. Application components that are built over them usually embody business logic and the presentation/controller logic that make up the application.
J2EE application components are available for the client tier, presentation tier, and business logic tiers.
These components include the following:
- Client tier: applets, Javabeans
- Presentation logic tier: servlets, Java server pages, Javabeans
- Business logic tier: Enterprise Javabeans

Applets: A web page received from the web tier can include an embedded applet. Written in the Java programming language, an applet is a small client application that executes in the Java virtual machine installed in the web browser.
JavaBeans is "The Enterprise JavaBeansarchitecture is a component architecture for the development and deployment of component-based distributed business applications. Applications written using the Enterprise JavaBeans architecture are scalable, transactional, and multi-user secure.
Presentation logic tier is the front end layer in the 3-tier system and consists of the user interface. This user interface is often a graphical one accessible through a web browser or web-based application and which displays content and information useful to an end user.

Servlet is a Java programming language class used to extend the capabilities of servers that host applications accessed by means of a request-response programming model. Although servlets can respond to any type of request, they are commonly used to extend the applications hosted by web servers.
JavaServer Pages (JSP) is a technology that helps software developers create dynamically generated web pages based on HTML, XML, or other document types.
Business logic tier: It communicates with other tiers by which it puts out the results to the browser/client tier and all other tiers in the network. In simple terms, it is a layer which users can access directly (such as a web page, or an operating system's GUI). Application tier (business logic, logic tier, or middle tier).

Enterprise JavaBeans (EJB) is one of several Java APIs for modular construction of enterprise software. EJB is a server-side software component that encapsulates business logic of an application.

Java Server Faces (JSF) is a Java-based web application framework intended to simplify development integration of web-based user interfaces. JavaServer Faces is a standardized display technology, which was formalized in a specification through the Java Community Process.

Creating a project
- Click Create New Project on the Welcome screen, or select File | New | Project.The New Project wizard opens.
- In the left-hand pane, select Java Enterprise.
- Specify the JDK that you are going to use (the Project SDK field): select one from the list, click New and select the JDK installation folder, or click Download JDK.
- Specify your application server. (We'll use GlassFish Server.)If GlassFish is not defined in IntelliJ IDEA yet, click New to the right of the Application Server field and select Glassfish Server.In the Glassfish Server dialog, specify the GlassFish Server installation directory.
- Under Additional Libraries and Frameworks, select the Web Application checkbox.
 Click Next.
 - Specify the name for your new project (e.g. JavaEEHelloWorld).
 Click Finish and wait while IntelliJ IDEA is creating the project.
Exploring the project structure
When the project is created, you'll see something similar to this in the Project tool window.

- JavaEEHelloWorld is a module folder (which in this case coincides with the project folder). The
.ideafolder and the fileJavaEEHelloWorld.imlcontain configuration data for your project and module respectively. The foldersrcis for your Java source code. The folderwebis for the web part of your application. At the moment this folder contains the deployment descriptorWEB-INF/web.xmland the fileindex.jspintended as a starting page of your application. - External Libraries include your JDK and the JAR files for working with GlassFish.
Developing source code
Our application will be a single JSP page application. Its only function will be to output the text Hello, World!
- Open
index.jspfor editing: select the file in the Project tool window and press F4. - Between
<body>and</body>typeHello, World! The code at this step is ready.
Running the application
In the upper-right part of the workspace, click  .
.

IntelliJ IDEA compiles your source code and builds an application artifact.
After that, the Run tool window opens. IntelliJ IDEA starts the server and deploys the artifact onto it.

Finally, your default web browser starts and you see the application output
Hello, World! there.
Modifying the code and observing the changes
- In
index.jsp, changeHello, World!toHello!.
- In the Run tool window, click Update
 .
.
- In the Update dialog, select Update resources and click OK. (For more information, see Application update options.)

- Switch to the web browser and reload the page to see the changes.

See also, Updating Applications on Application Servers.
Exploring a run configuration
When creating the project, we specified GlassFish as an application server. As a result, IntelliJ IDEA created a run configuration for GlassFish.
When we performed the Run command (), we started that run configuration. Now let's take a look at the run configuration and see how its settings map onto the events that we've just observed.
- Click the run configuration selector and select Edit Configurations.
 The Run/Debug Configurations dialog opens and the settings for the GlassFish run configuration are shown.
 The Before launch task list (in the lower part of the dialog) specifies that the application code should be compiled and the corresponding artifact should be built prior to executing the run configuration.
- Select the Startup/Connection tab to see how the server is started in the run, debug and code coverage modes.

- Select the Deployment tab to see which artifacts are deployed after the server is started.

- Go back to the Server tab.The settings under Open browser specify that after launch (i.e. after the server is started and the artifacts are deployed onto it) the default web browser should start and go to the specified URL (
http://localhost:8080/JavaEEHelloWorld_war_exploded).The settings to the right of On 'Update' action specify that on clicking in the Run tool window the Update dialog should be shown and the Update resources option should be used by default. (The last used update option becomes the default one).
- Click OK.
Exploring an artifact configuration
When creating the project, we indicated that we were going to develop a web application. As a result, IntelliJ IDEA, among other things, created a configuration for building a web application artifact. Let's have a look at this configuration.
- Open the Project Structure dialog: File | Project Structure or Ctrl+Shift+Alt+S.
- Under Project Settings, select Artifacts.The available artifact configurations are shown in the pane to the right under
 and
and  . (There's only one configuration at the moment.)
 The artifact settings are shown in the right-hand part of the dialog.
 Type. The artifact type is Web Application: Exploded. This is a decompressed web application archive (WAR), a directory structure that is ready for deployment onto a web server.Output directory. The artifact, when built, is placed into
<project_folder>/out/artifacts/JavaEEHelloWorld_war_exploded.Output Layout. The artifact structure is shown in the left-hand pane of the Output Layout tab.The <output root> corresponds to the output directory. Other elements have the following meanings:- 'JavaEEHelloWorld' compile output represents compiled Java classes whose sources are located in the
srcdirectory. These are placed intoWEB-INF/classesin the output directory. - 'Web' facet resources represent the contents of the
webdirectory.
Packaging the application into a WAR file
When you get to the stage when you are happy with your application, you may want to place it in a WAR (web application archive). To do that, you should create an appropriate artifact configuration and then build the artifact:
- Click , point to Web Application: Archive and select For 'JavaEEHelloWorld: war exploded'.
 A new artifact configuration is created and its settings are shown in the right-hand part of the dialog.
- Create a manifest file for your archive: click Create Manifest and agree to the location suggested by IntelliJ IDEA (
web/META-INF/MANIFEST.MF). - Click OK in the Project Structure dialog.
- Select Build | Build Artifacts.

- In the Build Artifact popup, point to JavaEEHelloWorld:war and select Build.
 Now if you look at the
out/artifacts/JavaEEHelloWorld_warfolder, you'll see the archive there.
Deploying an artifact onto a running server
Sometimes you need to deploy your app onto a running server. This section provides a how-to example.
Server run configurations that don't start a server are called remote. Such run configurations can be used, for example, for deploying applications to servers that are already running. (See Local and remote run configurations.)
Let's create a run configuration for deploying our WAR artifact to the running server and see how it works. (By now, the server has been started by the run configuration discussed earlier.)
- Click the run configuration selector and select Edit Configurations.
- Click, point to GlassFish Server and select Remote.

- Change the run configuration name Unnamed to something more sensible (e.g. GlassFishRemote).

- Specify the artifact to be deployed to the server: select the Deployment tab, click and select Artifact.
 In the dialog that opens, select the WAR artifact.
 The result should look similar to this:
- Click OK in the Run/Debug Configurations dialog.Now let's see how this run configuration works.
- Execute the run configuration: click .
 The run configuration output is shown in the Run tool window.
 After a while, a new tab in your web browser opens, and you see the application output there.
Packaging the application into an EAR: Using Java EE Application support
To package your Java EE application into an EAR, you should:
- Create a Java EE deployment descriptor
application.xml. - Configure an EAR artifact.
- Build that artifact.
As we are about to see, IntelliJ IDEA performs most of these tasks for you as part of its Java EE Application support:
- In the Project tool window, right-click your module folder and select Add Framework Support.

- In the dialog that opens, select the JavaEE Application checkbox and click OK.
 Note the descriptor file
META-INF/application.xmlcreated in your module folder.
- Open the file in the editor (F4).
 At the moment, the file is almost empty.
 - Now let's look at the artifact configurations.Note that a new configuration appeared, the one for an exploded EAR artifact.
 Currently only JavaEE Application facet resources (
META-INF/application.xml) are included in the artifact.
- Let's add a copy of the exploded WAR artifact to the EAR artifact structure. To do that, under Available Elements, expand the Artifacts node and double-click the exploded WAR artifact. Here is the result.
 (An alternative way of getting the same result would be .)
 - Note the message Web facet isn't registered in application.xml. Click Fix. (A bit later, we'll look at the changes made to
application.xmlby this quick fix.) - Create a configuration for an EAR artifact: .

- To create a manifest file, click Create Manifest and agree to the default file location (
<project_folder>/META-INF/MANIFEST.MF).
- Click OK in the Project Structure dialog.See that your
application.xmlhas changed. This is the result of applying the quick fix. Let's now create a run configuration for building and deploying the EAR artifact.
 - Click the run configuration selector and select Edit Configurations. Then, in the Run/Debug Configurations dialog, select .
- Specify a descriptive name for your run configuration, e.g. GlassFishRemoteEAR.

- Include the EAR artifact in the deployment list: switch onto the Deployment tab and select .Note that the Build 'JavaEEHelloWorld:ear' artifact task is included in the Before launch task list automatically.

- Switch to the Server tab and check the URL in the Open browser section. The part that follows
http://localhost:8080/should correspond to the<context-root>element in yourapplication.xml.
- Click OK in the Run/Debug Configurations dialog.
- Execute the run configuration ().As before, another tab opens in the Run tool window showing the run configuration output.
 Then, the application output is shown in the browser.
 Now if you look at the Project tool window, you'll see your archive in the
out/artifacts/JavaEEHelloWorld_earfolder.
Java Database Connectivity (JDBC)
Java Database Connectivity (JDBC) is an application program interface (API) specification for connecting programs written in Java to the data in popular databases. The application program interface lets you encode access request statements in Structured Query Language (SQL) that are then passed to the program that manages the database. It returns the results through a similar interface. JDBC is very similar to the SQL Access Group's Open Database Connectivity (ODBC) and, with a small "bridge" program, you can use the JDBC interface to access databases through the ODBC interface. For example, you could write a program designed to access many popular database products on a number of operating systemplatforms. When accessing a database on a PC running Microsoft's Windows 2000 and, for example, a Microsoft Access database, your program with JDBC statements would be able to access the Microsoft Access database.HTML is the standard markup language for creating Web pages. HTML stands for Hyper Text Markup Language.HTML describes the structure of Web pages using markup.HTML elements are the building blocks of HTML pages.HTML elements are represented by tags.
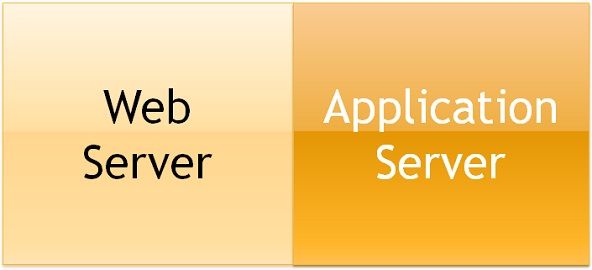
Compare HTML and J2EE Servers in their purpose and operation
The main difference between Web server and application server is that web server is meant to serve static pages e.g. HTML and CSS, while Application Server is responsible for generating dynamic content by executing server side code e.g. JSP, Servlet or EJB.
Model View Controller
Model View Controller or MVC as it is popularly called, is a software design pattern for developing web applications. AModel View Controller pattern is made up of the following three parts − Model − The lowest level of the pattern which is responsible for maintaining data.

3 Tier Application
A three-tier application is a specific type of n-tier architecture. In the case of three-tier architecture, the tiers are as follows: Presentation tier (also known as the user interface or the client application) Business logic tier(also known as the application server)
POJOs and Java Infrastructure
All JavaBeans are POJOs but not all POJOs are JavaBeans. A JavaBean is a Java object that satisfies certain programming conventions: the JavaBean classmust implement either Serializable or Externalizable; ... all JavaBean properties must have public setter and getter methods.
